We provide good tutorials to you…

Stay touch with us. We update consistently our blog. Computer basics, coral draw, adobe Photoshop, office any many more things for you. http://riseshinedesign.blogspot.com/

We provide good tutorials to you…

Stay touch with us. We update consistently our blog. Computer basics, coral draw, adobe Photoshop, office any many more things for you. http://riseshinedesign.blogspot.com/

We provide good tutorials to you…

Stay touch with us. We update consistently our blog. Computer basics, coral draw, adobe Photoshop, office any many more things for you. http://riseshinedesign.blogspot.com/

We provide good tutorials to you…

Stay touch with us. We update consistently our blog. Computer basics, coral draw, adobe Photoshop, office any many more things for you. http://riseshinedesign.blogspot.com/

We provide good tutorials to you…

Stay touch with us. We update consistently our blog. Computer basics, coral draw, adobe Photoshop, office any many more things for you. http://riseshinedesign.blogspot.com/

Monday 22 June 2015

Website Backup Setting

Website Backup Setting
Today I discuss backup of website through control panel. Backup of website is very important because website can be removed or hacked, and if user have backup at least he can recover the site.

If your website running is good then must take backup after one month.

Step 1: Login to your website through control panel.
www.siteaddress.com/cpanel
Write your own website address in place of siteaddress.  When you write
 www.siteaddress.com/cpanel enter the address bar look like this.
http://siteaddress.com:2082/


Step 2: Click on Backups button.


Step 3: Click on Download button.  Website download automatically and save in computer hard disk or cd.


Step 4: Click on Database name button. Database download automatically.  


Thursday 17 April 2014

Water Mark Movement and add Text and Page Number In Header of MS Word


Water Mark Movement and add Text and Page Number In Header of MS Word


In this lecture we discuss how to move water mark in MS word and how to add page number and text in header of MS word.
First we discuss Water Mark Movement
Step 1:  Start MS Word and run dialog box command is ( winword  )
Step 2: Design tab and then watermark.


Step 3: Edit water mark.


Step 4: In text area enter      http://riseshinedesign.blogspot.com


Step 5: Display after edit the text.


Step 6: Now insert tab ->header and blank header.


Step 7: Click on the water mark and now you can move water mark.


Step 8: You can change the size and move the water mark.


Now we discuss how to add page number and text in Header of MS Word.


Step 1: Insert->header


Step 2: Add text in header.   http://riseshinedesign.blogspot.com


Step 3: Enter Field


Next


Step 4: Text and the page number in the header.

If we directly enter text and page number, page number remove the text. Through this method we can enter text and page number.

Monday 14 April 2014

Age and Time Calculation In MS Excel

Age and Time Calculation in MS Excel

Step 1: First start excel, in run dialog box command is excel.
Step 2: Enter Two Dates


Step 3: Minus – two dates


Step 4: Right click on the cell


Click on  Number->Category->Custom->Type
.


Step 5: Enter formula (     yy “Years”, mm “Months”, dd “Days”    )


Step 6: Result


Step 7: Time Calculation


Step 8: Right Click on the cell


Step 9: Enter Formula  (      hh “Hours”, mm “Minutes”, ss “Seconds”     )


Result


Wednesday 19 March 2014

Microsoft Outlook Email Setting

Outlook Email Setting

Today we discuss outlook email setting, i use temporary data for email, you enter your own email address and data. 
Step 1: First we set outlook setting in control panel.  Start menu and click on control panel.

Step 2: In control panel click on Mail option.


Step 3: Mail Setup dialog box displayed.

Step 4:  If you have already profile remove it. Be careful before removing the profile if you have already account setting because it will remove your old email data.   

Step 5: Click on remove button and remove old setting.

Step 6: If you have no profile, Dialog box displays as below.

Step 7: Start Outlook 2003 or 2007 or 2013 whatever you have.

Step 8: Window+r for run command. Outlook run command is outlook.


Step 9: Enter Profile name. any name you like….

Step 10: Account Setup dialog displayed.


Step 11: Select manual setup option.


Step 12: Select POP or IMAP option. This option select according to the company setting.

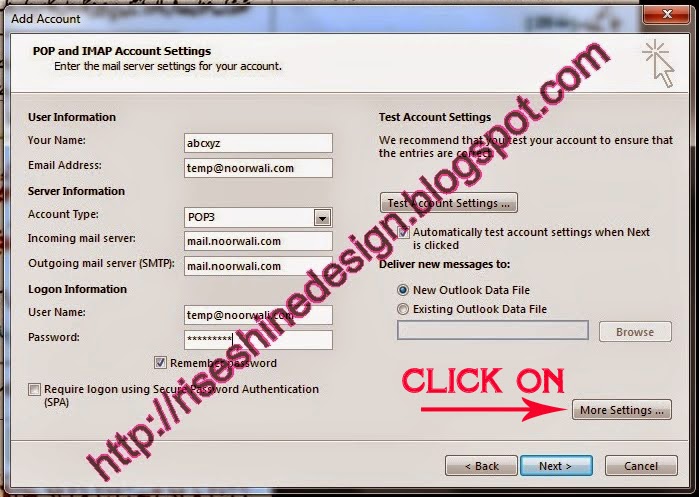
Step 13: Enter email information. In this step you enter your company information, your domain information.
Name: enter your name
Email Address:  company email address
Incoming mail server: enter (  mail.domainname.com  ) I enter    mail.noorwali.com ,enter your domain name.
Outgoing mail server: enter (  mail.domainname.com  ) I enter    mail.noorwali.com ,enter your domain name.
User Name: enter email address
Password: enter password
I enter email (  temp@noorwali.com  ) and password (   12345abc@  )

next step is click on more settings


and on outgoing server tick the checkbox of My outgoing server....


Step 14: Test account setting process.

Step 15: Process complete.

Step 16: Outlook page display after account setting.

Step 17: Inbox of your email.

Step 18: Compose new email.

Step 19: Sent folder.

Step 20: Open any email account. I open yahoo.
Yahoo email: husnain_raza39@yahoo.com
Password:       JANNAT125jannat

Step 21: Inbox of email and you can see email we send through outlook.

Step 22: Open email and we see our email data.


Step 23: Our sent folder and email.

Step 24: Again we open email account.

Step 25: Inbox of our email.

Step 26:  Email to temp@noorwali.com .

Step 27: Inbox view of outlook. Always press Send/Receive All Folders.


Step 28: Email view.


Thanks. In coming lectures I will tell you signature and different options of outlook.